The daring baker's challenge is definitely helping me to go beyond my normal baking scope (which, to be honest, has consisted of about a bizzillion batches of chocolate chip cookies lately - I blame it on the pregnancy!)
There are so many things that i want to try to bake, but...I just never get around to them for one reason or another. No more. Here is a list of items, not in order. Family, friends, any requests??
1. Donuts
2. Chelsea buns
3. Croissants
4. Some kind of semifreddo
5. Something kind of visually challenging. Maybe with fondant, perhaps themed for a holiday
6. Oh, and this:
http://www.epicurious.com/articlesguides/bestof/toprecipes/bestcakerecipes/recipes/food/views/Double-Chocolate-Layer-Cake-101275
My dear sister Katie likes chocolate a bit AND her birthday is coming up in 4 weeks. Seems like the perfect excuse to knock one off my list. If the baby holds off, I will definitely make this one by the end of AUgust. I'll post how it turns out.
Friday, July 29, 2011
Thursday, July 28, 2011
Daring Baker's July Challenge: Fresh Fraisiers


This was my very first challenge since joining the Daring Baker's. For those of you that don't know about it, it's an online community of baking enthusiasts who eagerly await a monthly challenge. Once the challenge is assigned, 27 days are given to make the item. Variations are allowed, but certain guidelines must also be followed.
For my Fraisier, I stayed fairly close to tradition but decided to make my own almond paste. Most almond paste recipes use egg whites but there's no cooking involved. Since I'm pregnant, I didn't use the egg whites. Instead I boiled water with corn syrup and sugar and then blended it with ground almonds and icing sugar to make a paste. The paste was a bit intense so i cut it with whipped cream and made the icing you see on the top of the cake.
For my Fraisier, I stayed fairly close to tradition but decided to make my own almond paste. Most almond paste recipes use egg whites but there's no cooking involved. Since I'm pregnant, I didn't use the egg whites. Instead I boiled water with corn syrup and sugar and then blended it with ground almonds and icing sugar to make a paste. The paste was a bit intense so i cut it with whipped cream and made the icing you see on the top of the cake.
Overall this was a big success and the pastry cream was divine. While it was a really light and summery cake (and a great use of strawberries), it was, as the challenge promised, very labour intensive and took about 4 hours of active time. So...this may be the only Fraisier that I ever make!
The recipe info is here (I used the basic chiffon cake and it was very, very light and airy - I will definitely use this recipe again): http://thedaringkitchen.com/recipe/fresh-fraisiers
Jana of Cherry Tea Cakes was our July Daring Bakers’ host and she challenged us to make Fresh Frasiers inspired by recipes written by Elisabeth M. Prueitt and Chad Robertson in the beautiful cookbook Tartine.
Friday, July 22, 2011
Pretty Old Things


A while ago we discovered Jadite and we never looked back. Now we are building our Jadite stock, trying to get a complete set of dishware, mugs, and the odd mixing bowl.
Jadite was made by Fire King and is a remarkably resilient. It was probably sold as a low end product, but today it's pretty pricey to get. The trouble is that they don't make it anymore, so there's limited stock and a surprising amount of interest - well, I'm not surprised I guess.
Much to our horror, Martha Stewart further popularized our little addiction when she launched her line of jadite inspired items. Her stuff is nice, but it's just not the same...
I'm also loving the Pyrex mixing bowls. My favourite is the wheat design, but all of them are really cool.
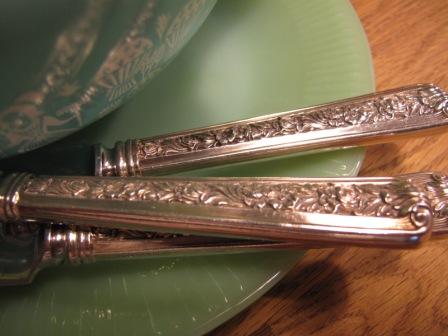
A while back I posted about the silver from my great grandmother. The question was whether or not to start using it every day and run it through the dishwasher. We decided to go for it and it's great. The pieces have some tarnish as a result, but the tarnish is pretty and it feels good to get use out of it.
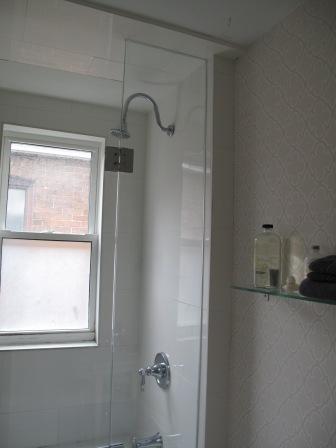
Updated bathroom


(The picture above is the before picture, but without the ugly shower curtain. It's hard to see, but the original tile was pretty hideous)
Our old bathroom was a bit of an illusion. It had been re-done by the previous owner right before he sold the house. Great, right? We quickly learned that it was not so great. The window in the shower wasn't properly water proofed, so needless to say, a bit of a problem in a shower.
The fixtures were cheap and the vanity much too large for the space. We had to put a shower curtain on both sides of the shower to address the window issue. Ugh. And the thing was, the light through that bathroom window was some of the best light in our house. We needed to do something, and fast!
As usual, I had very specific ideas. The tiles needed to be flat faced, with no 'puff' to them. I didn't want to get subway tiles and I knew I wanted white. Long story short, I searched forever and finally found the over sized laser cut tiles we used. We didn't want to replace the tub, as it was a deep soaker tub and it seemed crazy to get rid of it. The trouble was that it had a distracting wavy thing on the front, which I thought would not look good with the clean line look we wanted. This meant building out and tiling in front of the tub to cover it up. the contractor was skeptical, but he did a great job and it totally works!
Once we gutted it, we breathed a sigh of satisfied relief about deciding to re-do the bathroom. The original owner put the tile right on the dry wall! The sub floor was unsafe! He dropped the ceiling by over a foot just to accommodate the vent pipe! What a lazy trickster!
Once again, i wanted something minimal with clean lines but that still had a vintage vibe. We wanted to maximize the light and scale things according to the somewhat small space. While I was desperate for polished nickel fixtures, they were so pricey and just not the right choice for this house. Instead we focused on 1920's style fixtures and figuring out how to work with the modern over sized tiles so that they would work with the vintage stuff. The solution to that was to brick lay them (much like a traditional subway tile).
We chose a limestone floor in rectangular 'French Linen' (from 'Stone Tile'), as although we loved the classic but now very popular marble and hex options, we didn't want to be trendy.
A glass shower wall completed the look and now the space is very light filled and a pleasure to shower in. And the best part is that everything was done properly, so we don't have to worry about water coming down into the dining room!
Bird Mobile


This mobile is truly one of a kind. It was made by my sister Julia and her partner Emery and was such a labour of love. Hours of hand sewing resulted in this AMAZING mobile. Each bird is a unique combo of fabric and personality and the branches are beautifully lacquered.
I can't wait for our little guy to lay his eyes on this master piece! Julia said she found this modible craft on a blog, so I'll see if I can get the information from her to post.
Living room re-do


When we first moved in, our living dining room was a boring box. It drove me crazy! I knew this house was meant to have character, as it was originally built in the 20's, but it had all been stripped out.
When we added our furniture, it just felt dark and old lady-ish because we had so much wood and antique stuff. I worked on Charlie for AGES to re-do the living room (he doesn't like change) and finally he was on board. We're almost done, but this is it so far:
- Painted walls 'Delaware Putty' and trim 'Dune White' (Benjamin Moore)
- Added wooden shutters to windows
- Removed pre-fab banister and had one custom made, true to the era of the house
- Added a foyer, with a stained glass transom, circa 1890 something
- Found a great vintage fireplace (A Matter of Time on Jones), also from the 20's and then sourced a time appropriate tile surround from an architectural salvage (The Door Store)
- Changed all the lighting
- Replaced all of the furniture, mixing high and low, new and old
- We got the living room chairs from a cool retro store in Dundas, ON (Charlie's find!!)
- The cabinet in the dining area is from an antique fair - it's an old wash stand
- The couch and pillows are Crate and barrel and the dining room table is Ikea
- The dining chairs are from the Queen street antique shop and originated from an old school auditorium in Toronto
- The little bird I got in Stockholm
- The dining room photo was a gift from our friends Sanjay and Nicole (taken by Sanjay)
- We replaced the hideous cut glass front door insert with a simple frosted glass pane
Next we're adding a big piece of art to the dining room wall and a few more odds and ends...all fun and all worth the work!
Oh, and we funded some of it by selling our old furniture on Craigslist!!! Love Craigslist.
The pics are a bit mixed up, but the before ones are the ones with no furniture. It's funny, it looks brighter before, but I think that's due to the time of day...
Cottage Classics


The cottage is all about food for us. We have so much free time that it's easy to cook bigger meals and we like to eat and eat and eat!
I'm a big soup maker and beans are big in our lives. Here are a couple of items we made last week at Kennisis Lake:
Corn Chowder:
- I roasted 4 tomatoes and 6 ears of corn on the bbq
- In the meantime I sauteed onions, garlic , celery and fennel
- Then I added thyme, salt and pepper and chopped waxy white potatoes (2)
- Then I added the corn and tomato and a couple of veggie soup cubes and water
- I boiled and simmered for ages then pulsed it in the blender until chunky
- Finally I added fresh basil and salt and pepper to taste
This was delicious!! Next time I'm going to add a bit of chipoltle or maybe even a touch of liquid smoke.
Next we made quesadilla snacks:
Sauteed mushrooms, onions and garlic (in butter)
Spread on soft tortilla with gouda
Add fresh cilantro
Grill on bbq!
Also pictured are adobe beans (no recipe - sorry)
Apricot Basil Shortbread Tart


This is a summertime favourite in our house. We wait for the apricots to come in season and then I whip this little gem together. The crust uses a hard boiled yolk, which is what interested me about this recipe in the first place.
I find this tastes a bit better with a touch of extra salt in the crust and absolutely no more basil than is called for in the recipe. The end result is really pretty - I usually serve it on a dark wooden plate and sprinkle it with a bit of basil for the green colour (I didn't do that in this photo though).
Here's the recipe, which I found online and belongs to Roy Shvartzapel, a pastry chef at Cyrus in Healdsburg, California:
Ingredients
Pastry Cream
- 1 cup whole milk
- 5 tablespoon granulated sugar
- 1/4 cup packed basil leaves with stems
- 2 large egg yolks
- 2 1/2 tablespoons cornstarch
- 2 tablespoons unsalted butter
Pastry
- 1 hard-boiled egg yolk
- 1 stick plus 6 tablespoons unsalted butter
- 1/2 cup confectioners' sugar
- 1 1/2 cups all-purpose flour
- 1/4 cup potato starch
- 1 1/4 teaspoon kosher salt
Topping
- 6 apricots (1 1/4 pounds), halved
- 3 tablespoon granulated sugar
- 1/3 cup apricot jam, melted
Directions
Make the Pastry Cream
In a saucepan, combine 3/4 cup of the milk with the sugar and basil; bring to a simmer. Remove the milk from the heat and let stand for 15 minutes. Remove the basil and squeeze any milk back into the pan; discard the basil.
In a small bowl, whisk the remaining 1/4 cup of milk with the yolks and cornstarch until smooth. Slowly whisk the egg yolk mixture into the warm milk; bring to a simmer over moderate heat, whisking constantly until very thick, 2 minutes. Remove from the heat and whisk in the butter until melted. Scrape the cream into a bowl. Press a piece of plastic wrap directly on the surface and refrigerate until chilled, 2 hours.
Make the Pastry
Preheat the oven to 375 degrees . Spray a 14-by-4 1/2-inch rectangular tart pan with a removable bottom with nonstick cooking spray. In the bowl of a standing mixer, beat the hard-boiled egg yolk with the butter and sugar at medium speed until smooth, about 2 minutes. Add the flour, potato starch and salt and beat at low speed until just combined. Using lightly floured hands, press the dough evenly over the bottom and up the side of the tart pan. Refrigerate the crust for 30 minutes, or until chilled.
Bake the crust for about 25 minutes, until golden. Transfer the crust to a rack and let stand until cooled, about 1 hour.
Make the Topping
Increase the oven temperature to 450 degrees . Line a baking sheet with parchment paper. Arrange the apricot halves cut side up on the paper and sprinkle all over with the sugar. Roast for about 20 minutes, until the apricots are tender and lightly browned. Let the apricots stand until completely cooled, about 30 minutes.
Unmold the crust and transfer it to a serving plate. Using a small offset spatula, spread the cream evenly in the crust. Arrange the apricots on the cream, cut sides down, and brush with the melted jam. Cut the tart crosswise into strips and serve at once.
Notes
To make a 9-inch round tart, press the dough into a 9-inch round fluted tart pan with a removable bottom. Use 10 apricots and 1/4 cup of sugar for sprinkling. Double the pastry cream. Bake for 40 minutes.
Making Room for Baby!


Designing the baby's room was challenging but a good time. After obsessing over EVERY element I decided to make some stuff from scratch, rather than buy. My overall goal was a really sweet room that was definitely 'baby' but not too matchy or too gendered. It was important to have a really minimalist look that felt tied together and had some of the vintage echoes from the rest of the house.
We got the room painted in good old 'Cloud white' (Benjamin Moore) and bought the crib and dresser from Ikea. The curtains are in 'Milk Pail' and they're Martha Stewart. I made all of the art and floor pillows, with the exception of a velvet grey one that I bought, we re-purposed an old vintage chair, and I bought these cute little grey sheep skin rugs for the floor. My friend Rachel bought us a beautiful blanket for our shower and it fit in beautifully with everything.
The pictures where super easy to make:
Take vintage wall paper or scrapbook paper and cut out any shape you want. Glue it to card stock and frame it. How simple is that?? And not pricey at all.
For the pillows, i used the same shapes as I did for the art, and just used fabric paint in the palette of the nursery. Unfortunately, the fabric paint colours dried a little too bright, as compared with how they looked in the bottle. I wanted something a little more muted, but it wasn't the end of the world. I ended up making some chocolate brown elephant pillows for my sister's nursery too - it was a really unique and easy gift!
Whoopie Pies


Cupcakes have been SO popular, macaroons are everywhere in North America and, even marshmallows are now having their day.
But it's the whoopie pie bandwagon I wanted to jump on. Everyone seems to be doing it. Verdict? Tasty but I really don't see what the wild craze is about. It's just a puffy little cookie with some oreo like icing in the middle. Yes, there are a million possibilities in flavour...I get that. Sure, it tastes good - in the way almost all baked goods tend to. Maybe it's nostalgic for some people. And, I suppose they look kind of novel and exciting. Yet, as a baked good item, they really don't do much for me. I'm over it.
Maybe my indifference is the reason that i can't for the life of me find the recipe I used for this! There are TONS online though.
Peach Upside Down Cake


Another first: an upside down cake!
I made this to bring to dinner with Katy and Tim (Charlie's parents) and it was fun to make. This cake was made in the off season - maybe in May? - but peaches are amazing now, so seize the moment!
This recipe came from Style at Home I think. I modified it along the way, but failed to write down what I did...
Ingredients
Topping:
- 1/4 cup unsalted butter
- 3/4 cup golden brown sugar
- 4 ripe peaches, peeled and cut into 8 wedges each
Cake:
- 11/2 cups all-purpose flour
- 2 tsp baking powder
- 1/2 cup unsalted butter
- 1 cup granulated sugar
- 2 large free-range eggs
- 2 tsp pure vanilla extract
- 1/2 cup 35% cream
Directions
1 Preheat oven to 350ºF.
2 To make the topping, melt the butter in a small saucepan over medium heat. Add the brown sugar and cook for 2 minutes, stirring constantly, until sugar is melted. Pour the mixture into a 9" round cake pan with 2" sides; spread carefully with a spatula to distribute evenly along the bottom of the pan. Place the peaches in a circular pattern to cover the bottom of the pan. Set aside.
3 For the cake, stir together the flour and baking powder in a small bowl. In a large bowl, beat the butter and sugar with an electric hand mixer for 2 to 3 minutes, until the mixture is light and fluffy. Add the eggs one at a time, beating well after each addition. Add the vanilla extract and cream, and beat well until combined. Gently stir in the dry ingredients until just incorporated.
4 Spoon the batter evenly over the peaches in the cake pan. Place the pan on a baking sheet and bake on the centre rack of the preheated oven for 55 minutes, until the top is set and springy. Let the cake cool for 10 minutes before turning out upside down onto a plate. Allow to cool before serving. Serve with softly whipped cream if desired.
Charlie's Bday Cake


Every year I bake Charlie a birthday cake and I always give him the choice of any cake he wants. He never fails to challenge me and this year was no different. he asked for a carrot cake, which i had never made before. Specifically, he asked for a carrot cake injected with some sort of cream cheese icing. I pictured a giant carrot Twinkie (it turns out he was thinking jelly doughnut).
While I hate to disappoint, and I'm all for creative vision, I ultimately decided on a traditional layer cake. I couldn't imagine un-iced single layer cake with icing on the inside that wouldn't be dry. The thought of an iced layer cake that was also injected with icing seemed a little intense. So, sadly, the carrot twinkie was never to be.
Instead, I found this non vegan recipe online:
http://www.epicurious.com/recipes/food/views/Carrot-Cake-with-Maple-Cream-Cheese-Icing-102155
I skipped the maple frosting and used my own cream cheese frosting recipe:
- 1/2 cup (1 stick) unsalted butter, room temperature
- 3-4 cups confectioners' sugar (approx - I don't measure)
- 1/4 cup milk
- 1/2 teaspoon pure vanilla extract
- 3/4 of a brick of philly cream cheese
The cake was a big success and I will definitely make this again and again. I'm a carrot cake maker now!
Bootie love

After cruising Etsy for anything crocheted, I found these adorable little hand made booties and baby shoes. They are made by a woman in the states and I haven't seen anything like them in stores. I bought 12 pairs. And a hat. In defense of my sanity (and I know babies don't actually need boots and shoes), I gave away 9 pairs.
Check out the Etsy shop:
http://www.etsy.com/people/JCrochetShop
Can't believe it's July!
Okay, so here's the thing...I've actually been blogging all this time - in a way. I've been saving up pictures and ideas and just never got around to posting. As a result, I've got a lot to post today :)
Since my last post I became pregnant and am getting really close to the big day! Suddenly nursery decor has become a real focus and I've been doing some crafting for the baby's room. As usual, I've been baking up a storm (and eating up a storm...)
Since my last post I became pregnant and am getting really close to the big day! Suddenly nursery decor has become a real focus and I've been doing some crafting for the baby's room. As usual, I've been baking up a storm (and eating up a storm...)
Subscribe to:
Posts (Atom)